Pages

Snow Covered Crunch Bars

When I found this recipe I knew I just had to try it out.  You combine sugar cookies, chocolate, crunch and throw in some peanut butter, it is an amazing combination.  My son's reaction was they were "pretty bomb"(which in his terms means he loved them in an interesting way.) 
Snow Covered Crunch Bars
adapted from Betty Crocker
1 pouch (1 lb 1.5 oz.) sugar cookie mix
1 cup butter, softened
1 egg
1/2 teaspoon vanilla
2 cups chocolate chips
2 cups peanut butter
5 cups crispy rice cereal
 1/4 cup powdered sugar
Heat oven to 375 degrees.  Spray a 13 x 9 pan with cooking spray.  In a large bowl stir cookie mix, 1/2 cup butter, egg and vanilla.until a soft dough forms. Press dough in the bottom of the pan.
Bake 10-12 minutes or until the edges are light golden brown. 
 Cool 15 minutes.
In a large microwavable bowl, microwave chocolate chips and the remaining 1/2 cup butter on High, stirring after 1 minute, unitl the chocolate is melted and smooth.  Add peanut butter and mix until well blended.
Crush cereal just a bit in a large resealable bag.  Gently stir cereal into chocolate mixture until cereal is coated.  Spread mixture evenly over cookie crust, gently press. 

Sprinkle with powdered sugar. Refrigerate for about 1 hour or until bars are set.  Store covered at room temperature.
Linked to:
reade more... Résuméabuiyad

Tried It Out Thursday: Simple Fruit Fly Trap

We have been having some fruit fly issues in our house lately.  They are so annoying and just plain gross.  The other day I came home from work to find a small bowl covered with plastic wrap on the counter by the fruit.  I was pretty curious to what it was.  It was my sweet nine year old and she created a fruit fly trap.  She put a small piece of banana in the bowl, covered it with plastic wrap, taped it to the bowl and poked a few small holes in it.  I don't know where she got the idea, but it worked brillantly.  The flys go in through the holes and can't get out. 
This is after just a day.  Check out all the flies it caught.  Our fruit fly issue was solved!
Thanks Kelsee!

reade more... Résuméabuiyad

Frozen Sweet Potato Fries: Are They Worth the Price? the Calories?

Frozen Sweet Potato Fries (Crinkle Cut Fries from McCain)
Today's product review: A look at what I thought was a promising development in the frozen food aisle at the grocery store, sweet potato fries. How do they taste? Are they worth the money? I suppose I shouldn't be shocked -- shocked! -- but I am.

It turns out that frozen sweet potatoes:
- do taste okay, not great, but okay.
- are three to four times more expensive than fresh sweet potatoes!
- have 50% to 68% more calories than fresh sweet potatoes roasted at home!
- are made with a whole long list of "other" ingredients.

THE BACKGROUND Last summer, my favorite busy mom brought sweet potato fries to a pool party. I was a late arrival so only a few scraps were left but even cold, the sticks of baked sweet potato were pretty tasty!

Fast Forward Three Months, as I set out to try frozen sweet potato fries for myself. I gotta tell you, I was fully prepared to "love" these products. I expected to extol the virtues of "convenient whole food" from the freezer, like peas or corn or broccoli or cauliflower or spinach. I imagined doing a post with three or four different spice mixes for sweet potato fries. I was going to love these, readers were going to love them too! I cooked and ate them before looking any deeper.

THE TASTE TESTS I baked up two different packages of frozen sweet potato fries, unknowingly setting up a David and Goliath smackdown. This was entirely unintentional: I'd never heard of either company until I started writing this post, their products were the only two in my local supermarket, Schnucks.
Sweet Potato Julienne Fries from the privately held New York company Alexia which claims to be 'reinventing the frozen food category'
Sweet Potato Crinkle Cut Fries (pictured) from McCain, the $6 billion Canadian company known for frozen food products


HANDS-ON TIME A+
Alexia: 1 minute
McCain: 1 minute

TIME to TABLE B-
Alexia: 35 - 40 minutes (including 15 minutes to preheat the oven)
McCain: 35 minutes (including 15 minutes to preheat)

TASTE B-
Alexia: Good enough, especially hot-hot from the oven, after that, soggy and unappealing. They were pretty crisp, though not like fast-food fries, say.
McCain: The same pros and cons applied here. I liked these slightly better, but it might have been the eye appeal of the crinkly fries.

INGREDIENT LABELS D+
Whew, I'd imagined a one-item ingredient list, you know, sweet potatoes but these long lists of ingredients sent on the hunt for definitions. I really should have checked the labels beforehand, to know what I was getting into. I'm not a chemist or a food scientist, just a home cook so my interpretations of the ingredients are [shown in brackets].


EXPIRATION DATES C- & A+
Alexia: The package reads, "6180 0076 10 Sell By 6180 03 17 12". I suppose this means that the product should be sold by March 17, 2012 (about 18 months from purchase) but if so, maybe they could just say so?
McCain: The package reads, "Best Before Jun 2011" (about 9 months from purchase). Okay, that's clear, thanks.

CALORIES per SERVING Note: Both companies use a three-ounce serving. For apples-to-apples comparison with other recipes from A Veggie Venture, I'm using four-ounce servings.


THE CALORIE IMPACT
Alexia: There are 48% more calories in the Alexia frozen sweet potato fries than fresh sweet potatoes roasted at home.
McCain: There are 68% more calories in the McCain frozen sweet potato fries than fresh sweet potatoes roasted at home.

PRICE D-
Alexia (regular sweet potato fries): $3.19 - $3.68 per pound (15-ounce package on sale for $2.99, regular price $3.45)
Alexia (spicy sweet potato fries): $4.26 - $4.90 $ (15-ounce package on sale for $3.99, regular price $4.59)
McCain: $2.69 per pound ($2.69 for 16-ounce package)
For comparison, Fresh Sweet Potatoes: $1.19 ($1.00 per pound store price, adjusted to $1.14 per pound for 2 ounces inedible skins plus $.05 estimate for olive oil and salt and pepper for roasting)

THE COST IMPACT
Alexia (regular sweet potato fries): 2.7 - 3.1 times more expensive than roasting at home
Alexia (spicy sweet potato fries): 3.6 - 4.1 times more expensive
McCain: 2.3 times more expensive

PRICE PREMIUM for TIME SPENT
To compare, I washed, peeled, sliced, oiled and seasoned two sweet potatoes weighing a little more than a pound. It took 10 minutes, including measuring, weighing, dropping the dishes into the dishwasher. At the costs shown above, that 10 minutes is the equivalent of:

Alexia (regular sweet potato fries): $12 - $15 per hour ($25,000 to $31,000 per year)
Alexia (spicy sweet potato fries): $18.50 - $22.25 per hour ($38,300 to $46,300 per year)
McCain: $9 per hour ($18,700 per year)


NOW WHAT?
The common wisdom is, "Consumers are willing to pay for convenience." Apparently we are, in both dollars and calories, all to save 10 minutes. Time is precious but my goodness, are these the consequences of saving time so that we can, what, watch more TV? take a run? "talk" to our friends on Facebook? toss a football with the kids in the backyard? check e-mail? sleep? (Yes, GOOD things can happen with an extra ten minutes.)

But I'm so conflicted. I WANT frozen sweet potato fries to be better. I WANT our best food companies to deliver convenience and good nutrition and a good value. I WANT to say, "Yes, frozen sweet potato fries are good for us!" Surely, surely, human ingenuity can do better.


© Copyright Kitchen Parade 2010


reade more... Résuméabuiyad

Crock Pot Green Chile Enchilada Casserole

As you all know, I LOVE Mexican food.  I was so excited to find this recipe and had to try it out.  The bonus, it cooks in the crock pot!! I had never had green enchilada sauce before and now I am sold.  It was delicious.  I left the casserole for dinner and when I came home from work that night, there was none left.  They ate the WHOLE thing.  So I can't give you a personal taste preference, but according to the family, it was really good!  (Atleast they remembered to take a picture)
Crock Pot Green Chile Enchilada Casserole
adapted from Betty Crocker
1 can (4.5 oz.) chopped green chiles
1 can (10 3/4 oz.) can cream of chicken soup
1 can (10 oz.) can green enchilada sauce
1/4 cup Miracle Whip or mayonnaise
12 (6 inch) corn tortillas (cut into strips)
3 cups cooked and shredded chicken
1 can (15 oz.) black beans, drained and rinsed
2 cups shredded cheddar cheese
chopped tomatoes
chopped or shredded lettuce
sour cream
Cut the tortillas into strips.  I kept mine in 3 different piles cutting 4 at a time.
Spray 3-4 quart crock pot with cooking spray.  In a medium bowl mix green chilies, soup, enchilada sauce and Miracle Whip (or mayonnaise).
Arrange 1/3 of the tortilla strips in the bottom of the crock pot.
Top with 1 cup chicken and 1/2 cup beans
Top with 1/2 cup cheese and 1 cup of the enchilada sauce mixture, spreading to the edges of the cooker.
Repeat layers twice, reserving the last 1/2 cup of the cheese.
Cover, cook on low heat for 6-7 hours.
Top with the remaining 1/2 cup cheese. Cover; cook about 5 minutes longer or until the cheese is melted.
Serve garnish wiht tomatoes, lettuce and sour cream.
reade more... Résuméabuiyad

Menu Plan Monday

This was a very busy weekend, but exciting!  Let me brag for 1 minute...The cross country sub-district race was Saturday and my son WON!!  He beat the next runner by about 14 seconds.  It was so cool.  Then we had the homecoming dinner at our house and thanks to help of Kody's date's mom, the table looked gorgeous (her table cloth, napkins, goblets and candle holders.) 
Check out those beautiful goblets they go perfect with my china and she gave them to me. It was so sweet!
It looked so good with the candles lit and the white lights strung up on the walls.  The girls kept commenting on how fancy everything looked. (WHEW!!) Dinner went great, they had a good time and he looked so handsome in his tux!!
Now on to this week! 
This Weeks Menu:
Monday: Chili
Thursday: Picnic Night
Friday: Baked Penne Pasta (from the freezer)
Saturday: Malibu Chicken
Sunday: Roast
Wishing you a delicious week!

Linked to Menu Plan Monday.
reade more... Résuméabuiyad

Bacon & Cheddar Corn Bread

 This particular day I needed something to add to dinner and I needed it quick.  Luckily I had a box of cornbread mix, added  a few ingredients and it was delicious!! 
Bacon & Cheddar Corn Bread
Preheat oven to 400 degrees
1 box cornbread mix (15 oz.) or your favorite corn bread recipe
Prepare as directed on box.
Add:
1 cup drained, canned corn
1/2 cup bacon, cooked and crumbled
1/2 cup shredded cheddar cheese
1/4 cup diced onion
Mix gently until ingredients are combined.  Pour into a lightly greased 9 x 13 pan. 

Bake for 20-25 minutes or until light golden brown.
reade more... Résuméabuiyad

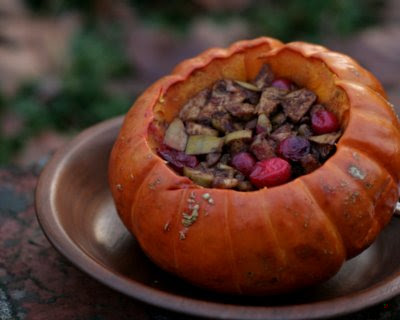
Stuffed Pumpkin with Apple & Cranberry ♥

Stuffed Pumpkin with Apple & Cranberry
Today's fun fall recipe: Stuff a pumpkin with apples and cranberries and nuts and spices and what do you get? Great flavor, whether for a side dish or a dessert. Gorgeous presentation, even though easy-easy to make. Not just vegan, "Vegan Done Real".

Two years ago, four of us celebrated one of those 'significant' birthdays ending in zero within a couple of months. One of the husbands cooked dinner for us, a present in itself. Last year, we decided to make a joint birthday celebration an annual event and all of a sudden, we were assigning courses for a potluck supper. Georg? Appetizer. Kathy? Dessert. (I'm still drooling over that dessert, homemade vanilla ice cream with homemade dulce le leche and hot fudge and three, count 'em, three beautiful little butter cookies.) Ann was less settled but soon knew she wanted to do something, not sure what exactly, with a pumpkin from her CSA. And this is what she brought -- a pumpkin stuffed with apples and cranberries and nuts. It was gorgeous! It made for a perfect side dish with roast chicken and wild rice pilaf I added to the table.

Within a few days, I made another and served it as dessert. Both? Wonderful. The dramatic presentation makes it looks as if you've maybe slaved.

MORE STUFFED PUMPKIN RECIPES Stuffed pumpkins are showing up everywhere! There's the savory side, Fall Stew Baked in a Whole Pumpkin and then another dessert, this time with custard, it's Whole Pumpkin Baked with Custard.

REVIEWS
"It was perfect! I made whipped cream laced with cinnamon and everyone raved - even my "foodie" guest!" ~ Lisa
"Wow, that was delicious!" ~ Hobbea
Keep Reading ->>>
reade more... Résuméabuiyad

Menu Plan Monday

Fall has arrived in our area.  We finally shut all the windows and my daughter complained all morning how cold she was (it was so dramatic!).   I will take the cold mornings because the afternoons are beautiful not to mention I love the changing colors that fall brings.  This week is a bit crazy, I am working full time this week (days yay!!), we are preparing for Kody's cross country sub-district race and homecoming dance (dinner at our house, so wish me luck!!). 
This Week's Menu
Monday: Bacon Mac & Cheese
Tuesday:  Surprise Meatloaf
Wednesday: Crock Pot Chicken Enchilada Casserole
Thursday: Picnic Night
Saturday: Homecoming Dinner TBD
Happy Fall Y'All!!
~Tiffanee
reade more... Résuméabuiyad

Samoa Delights

This has become my new favorite!! These cookie bars remind me of the Samoa Girl Scout cookies. One word: Yum! I made them for my family when they came to visit. They were delicious and a huge hit! 
Samoa Delights
adapted from The Taste of Home
1 cup butter, softened
1/2 cup plus 2 Tablespoons white sugar divided
3/4 teaspoon almond extract
1/2 teaspoon vanilla extract
2 cups flour
1/4 teaspoon salt
1/4 teaspoon baking powder
1/2 cup flaked coconut
1/2 cut sliced almonds
1 jar (12 1/4 oz.) caramel ice cream topping
3/4 cup chocolate chips (I used milk chocolate)
Cream butter and 1/2 cup sugar until fluffy.  Beat in the extracts. Add the flour,salt and baking powder and mix well. Press into a greased 9 x13 inch pan.
Bake at 350 degrees for 10 minutes. 
Remove from oven and prick crust with a fork. Sprinkle with remaining 2 Tablespoons of sugar. Bake 15 more minutes or until set.
Meanwhile, place coconut and almonds in a food processor. Process until finely chopped. Transfer to a small bowl.
Stir in ice cream topping.
Spread over the crust.
Bake for 5-10 minutes or until the edges are bubbly. 
Allow to cool.
In the microwave melt the chocolate chips, stir until smooth.  Spread over the caramel layer. Place in the freezer for a few minutes to set the chocolate.
Cut into bars.
Enjoy!!
~Tiffanee
reade more... Résuméabuiyad

Roasted Garlic Soup ♥

Roasted Garlic Soup
Today's soup recipe: A garlic soup, deepened with roasted garlic and made creamy with potato plus a splash of cream. Low carb and for Weight Watchers, 2 or 3 points. Plus, my annual reminder that we plant garlic in the fall some time in the middle of October.

Did my home-ec teacher mother even know about garlic? Surely, she must have. But if she did, garlic awareness didn't translate into garlic cooking, perhaps, I suspect in her defense, because fresh garlic wasn't available in our small-town grocery?

So I was 13 or 14 when garlic entered my life, not with a bang but a full-nasal blast. My Auntie Karen's house reeked of garlic when she made Chicken Cacciatore for my annual birthday supper. What WAS that smell? She laughed and held out a head of garlic for inspection. How could something so small pack such a punch?

How far our food world has come! Few kitchens are now without garlic, it's a staple. And for awhile now, in my kitchen, not only is garlic a staple, so is roasted garlic. It's the basis for this creamy soup, which also packs a punch and to my taste, anyway, is best enjoyed in a small serving.

REMINDER: If you live in the northern hemisphere, it's time to plant garlic! Find out all the details in a 2007 post, How (and Why) to Grow Garlic at Home.
Keep Reading ->>>
reade more... Résuméabuiyad

Mexican Coleslaw

This recipe comes from my brother and sister in law. They are both avid and great cooks. When they told me we would be eating Mexican Coleslaw I was intrigued (I love Mexican food.)  It is a bit different than any other salad I have had, but oh so delicious!! Thanks Royce & Heidi!!
Mexican Coleslaw
2 (15 oz.) cans black beans, rinsed and drained
1 1/2 cups corn (fresh, canned or frozen)
1 cup celery, chopped
1 red bell pepper, diced
2 jalepenos, seeded and minced
1/2 cup minced cilantro

Dressing:
1/4 cup lime juice
1/4 cup canola oil
2 Tablespoons brown sugar
1 Tablespoon Dijon mustard
1/2 teaspoon salt
1/2 teaspoon pepper
Mix dressing ingredients together until well blended.  Pour over salad and mix to coat.  Allow to chill for a few hours so the flavors can mix.  We ate it with tortilla chips and some others put it on top of their chicken.
*You can substitue 1/2 the black beans for another type of beans. Heidi uses 1/2 garbanzo beans.
Place salad ingredients in a bowl and
~Tiffanee
reade more... Résuméabuiyad

Blueberry Cream Cheese Bundt Cake

One word for this one: DELICIOUS!!  It is so moist and easy to make.  It did not last long around our house.  My daughter finished the last little bit for breakfast  (she was afraid it would not still be there when she got home).
Blueberry Cream Cheese Bundt Cake
1-8 oz. package cream cheese, softened
1/2 cup vegetable oil
1 package white cake mix (mine was vanilla)
1- 3 oz. package instant vanilla pudding mix
4 eggs
2 teaspoons vanilla
2 1/4 cups fresh or frozen, thawed blueberries
powdered sugar

Preheat oven to 325 degrees. Lightly spray a 9 inch bundt pan with cooking spray.
Combine the cream cheese and oil in a medium bowl and beat with a mixer until smooth and creamy. Add the cake mix, pudding mix, eggs and vanilla. Beat at medium speed until blended. Fold in the berries. (Dough will be thick and sticky).  Pour into the prepared pan.
Bake for 60 -65 minutes until a wooden pick inserted in the center comes out clean.  Cool the cake on a wire rack for 20 minutes. 
 Remove from pan and cool completely. Sprinkle with powdered sugar before serving.

YUM!!
~Tiffanee
Linked to:
reade more... Résuméabuiyad

Killer Deal on a New Blog Design!

I have so been wanting a new look for this blog and keep telling myself "When I get the time, I will figure it all out." Yah right! That is why I was so excited to find out that over at Inspiring You to Save she is offering a killer deal on a new blog design!! She is so talented! She is offering a $105 for only $10 that is 92% off.  For this price you get:
Custom Header
Custom Background
Custom Button w/ Code
Custom Post Divider
Custom Signature
Matching Text Color
Text Navigation Bar
Widen Blog and/or Sidebars
1-3 Column Design
Installation
Hurry over here at Inspiring to Save to get this killer deal the offer expires 10/11 at 11:59 EST.
I am excited to be linking up at Inspiring to Save's Meet Me Monday party!!
~Tiffanee
reade more... Résuméabuiyad

Menu Plan Monday

It is about time I get back to doing this important task.. Since I have been working nights, hubby has been doing the planning and cooking which is nice.  I must admit I miss it though.  Cooking is something I really enjoy and I love sitting down with my family for dinner.  This week I decided that I needed to get more involved so here is my plan!!
Tuesday: Crock Pot Chicken Enchiladas
Wednesday: Chicken Alfredo
Thursday: Chili
Friday: Picnic Night
Saturday: BBQ Chicken/ Creamy peas and potatoes
Sunday: Roast
I actually had success with a few recipes last week that I can't wait to share!!
Wishing you a delicious week!!
~Tiffanee
reade more... Résuméabuiyad

My Favorite Way to Roast Beets: An Illustrated Cooking Lesson from the Beet Queen

My Favorite Way to Roast Beets
How to roast fresh beets with minimum fuss and an abundance of earthy, sensual beet flavor. After many years of cooking beets one way or another, in my experience, this is the best way to cook fresh beets.

If you ask the Beet Queen (aka me, Alanna) how to roast beets, what oven temperature to use for roasting beets, even how long to roast beets, I'll tell you, "It depends." You see, I've tried so many ways of roasting beets, some simple, some a little complicated, some worth remembering, others not. It's taken five years of cooking beets to settle onto my favorite way to roast beets. This method takes the least fuss and every time, yields moist and earthy cooked beets.

Roasting beets is easy but it helps to arm yourself with a few shortcuts, tips and techniques I've collected over the years. And once you've roasted beets, there are soooo many quick salads and sides to choose from. Check out all the beet recipes, the ones that call for pre-cooked beets are marked like this . They don't call me the Beet Queen for nuthin'.

WHAT YOU'LL NEED to ROAST BEETS
A cutting board
A large oven-safe pot with a cover
A sharp knife
A little oil
That's all!

STUMBLEUPON: For all who use the great discovery tool StumbleUpon, I'd love for this post to be 'stumbled'!


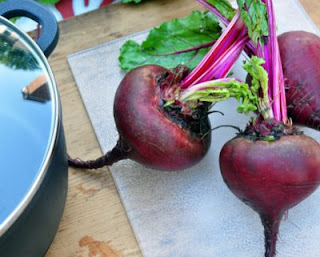
Set the oven to 375F.Behold the beautiful beet! Such knobs of dark and mysterious beauty, we shall capture their hearts, just as they romance the tastebuds of all beet lovers.

Before getting started, turn the oven to 375F.
Clean the beets, especially the rough areas. But be gentle! We're doing to deal with the beet bulbs and the beet greens separately.

First, scrub-scrub-scrub the beet bulbs themselves. Clean them under running water, rubbing the skins with your fingers to brush off any stubborn grit, paying special attention to all the rough parts where the stems sprout out and to the "tail".

But be gentle! Don't scrub the beets too hard, otherwise the barrier of the skin will weaken and if it does, liquid and flavor will leak out during roasting.

While you're washing the bulbs. give the greens a quick rinse too.
Cut off the greens, leaving some stem. Leave the 'tail' intact too. Cut the greens off the bulbs, leaving about a half inch to an inch of stubby stems. Don't touch that tail either!

Actually, it's not a 'tail' even if it does look like a mouse's tail. It's the "tap root" of the beet, the bit that reaches deep into the soil to gather up minerals and all the wonderful earthy flavor that we love about beets.

Why leave a bit of stem on, why leave the tail / tap root alone? We don't want to risk cutting the beet's flesh, effectively 'wounding' the beet, letting liquid and flavor leak out during roasting. That's bad for the pan (one big sugary mess) and bad for the beet lover (dry and shriveled beets). NOT good.
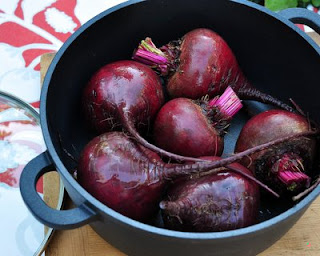
Arrange in a large pot.Drop the beets into a large deep pot such as a Dutch oven, something with a lid, something that can go in the oven.

I suppose if your pot is deep enough, you could do more than one layer. But one layer is all that will fit in my Dutch oven so that's all I've ever roasted.

If you have an extra beet that won't fit, make yourself a Raw Beet Sandwich. Yum. Plus it's going to be awhile before the beet babies are roasted.

Or maybe you've got way more beets than will fit? You are going to love-love-love the oh-so-gorgeous Greens 'n' All Beet Soup.
Put a smidgen of oil on each beet. Ooops, sorry for the distractions. This is the Beet Queen talking, after all.

Pour a tiny bit of oil on each beet, about a teaspoon apiece.
Rub the oil all over the beet skins.Now get in there with your hands and rub that oil all over the skins.
Cover and put into the oven for an hour. Cover! I mean it, cover the pot! Once I forgot the lid and these lovely little beets from the farmers market didn't cook during the first hour and had a really off taste when I covered them and roasted a second hour. It was a "save" that didn't work.

Put the beets into the oven for about an hour. (If the oven hasn't fully preheated, don't worry, just put the pot in the oven and set the timer for 60 minutes plus whatever number of minutes remain for the oven to come to the roasting temperature.)

Timing is always iffy with beets, however, so please don't "count" on them for supper in exactly an hour because some times roasting beets takes longer than an hour. I haven't been able to figure out the difference, maybe it's the size of the beets, how fresh they are, how they've been stored, how dense the beets are, etc. But when someone asks me how long to roast beets, I will always say, "Roast beets for an hour, then check every 15 minutes or so until they're done."

To promote even cooking, especially with large beets, some times I turn the beets after 20 and 40 minutes.
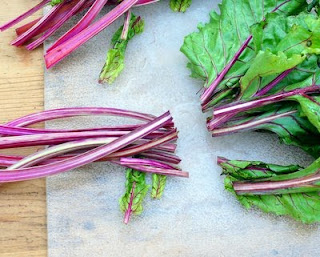
Line up the greens, then chop off the stems. Now the greens -- if you've got any even tiny thought of throwing them away, banish the thought! This is going to be so easy!

Ooops, no photo, but check the greens again by rubbing the a leaf or two with your fingers. If there's any feel of grit, head back to the sink and rinse the leaves again under running water, gently rubbing the leaves with your fingers to loosen the dirt. If the greens are really gritty, soak them in cool water for a few minutes, sloshing them around every so often. Rinse them under running water again, making sure to get right into all the crevices.

Once the greens are grit-free, line them up at the junction of the stem and the leaf, then slice off the stems.

If the stems are thick and crotchety looking, well, unless you're really frugal, toss 'em, they're just not worth it. But if they are thin and perfect like these, they cook quickly and add lots of fiber. They're good!
Throw away any bruised or tough leaves. Check the leaves themselves. If any are bruised, as shown here, give them a toss. If any are tough or cracked, throw them away too.
Keep the stems and leaves separated Keep the stems and the greens separate because they have different cooking times.

Now I'm going to introduce you to one of my best cooking secrets. Okay, I share all my best recipes, no secrets there, so let's call this my favorite technique for cooking greens, beet greens and other greens too. This is how to cook greens, quickly and easily, but hold them for a day to two to eat later! Greens are so tender and perishable, this lets you do a little "cooking" now but postpone the "eating" until later.

Say hello to Greek Greens. Fresh greens need never go to waste again.
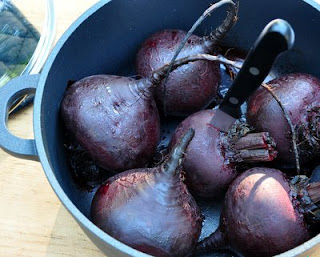
Test for doneness by inserting a knife deep into the centerBack to those roasted beets! It's time to check to see if they're done or not.

Insert a thin knife right into the center of the beet. If it goes in easily, the beets are done. If there's resistance, put the beets back into the oven for 15 minutes, then check again.

I've had beets take as long as 2 hours to roast. Remember what I said about not counting on beets for supper at a specific time? This is why.

Patience, let the beets cook until they are soft and fully roasted, all the way through.
The best way to enjoy that first hot beet! ASIDE: And once the beets are cooked, oh my, here's a treat for hungry beet lovers, one I look forward to every time I roast beets.

Just skin and slice a hot-hot beet and dab with butter and if you like, a little good salt or a sprinkle of Spanish paprika. Ohhhhhhhh so good!

Go ahead and eat one, I'll wait. Isn't that first beet just delicious?

This "recipe" was given to me by a reader from Brunswick, Missouri. I'm so forever grateful, I call the recipe King Hill Farms Simple & Sublime Beets.
Let the beets cool. Once the beets are fully cooked, let them cool down until they're cool enough to handle.

Word to the wise: It would be just fine to refrigerate the beets right now for eating later but the skins are slightly easier to remove when the beets are still warm.
Slice off the stem end of the beet. Let's peel these beets! It's a little messy and your hands, yes, will stain. Call it a Beet Queen badge of honor.

First, slice off the stem end.
Rub the beet skins with your fingertips. Rub the beet skins with your fingertips, they will slip right off! A knife can help with any resistant bits.

So that's all there is to it! You've roasted a big panful of beets and from now on, quick beet dishes are just a few minutes away because the cooking is already done.


FAVORITE WAYS to ENJOY ROASTED BEETS
~ How to Make a Roasted Beet Salad ~
~ Beet Carpaccio ~
~ Harvard Beets ~
~ Red Onion Beets ~
~ Borscht Beets ~
~ Beets with Feta ~
~ Beet Pesto ~

~ more beet recipes ~

MORE WAYS to COOK BEETS
~ Microwave Beets ~
~ Summer Borscht ~
(Beets Cooked in Water on Stovetop)
~ Roasted Beet Supper Salad ~
(Beets Peeled Then Roasted)
~ Pan-Pickled Beets ~
("Pickled" in a Skillet)


© Copyright Kitchen Parade 2010
reade more... Résuméabuiyad